
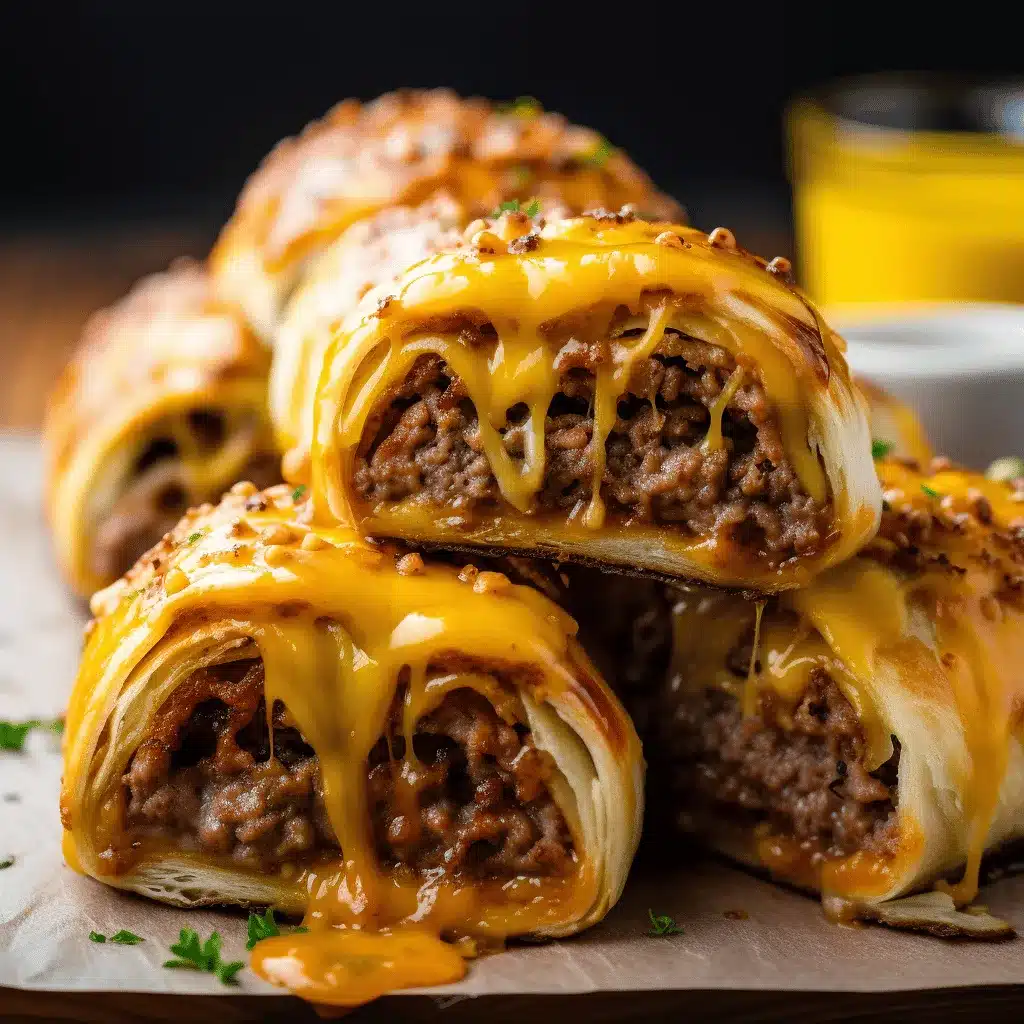
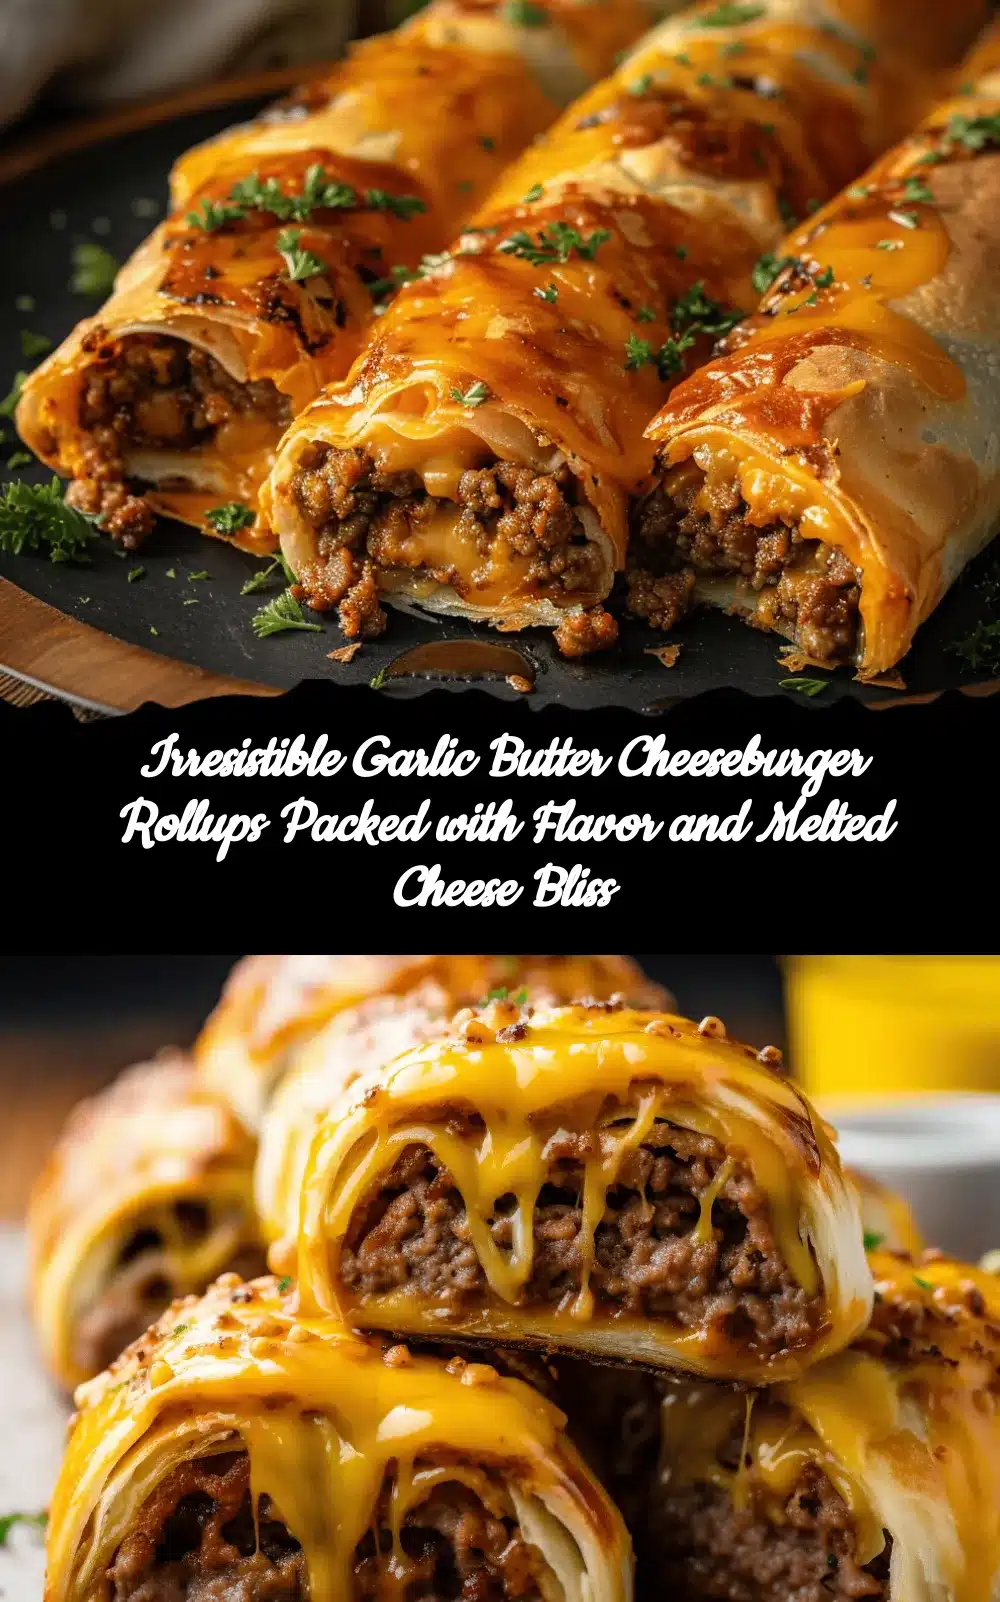
The sizzle of juicy beef, melty cheddar oozing out, and that unmistakable whiff of garlicky butter—oh, it gets me every time! When I first whipped up these garlic butter cheeseburger rollups, it was a total game-changer for our family dinners. Honestly, you know those nights when everyone’s starving and you don’t want to fuss with a dozen pots? That’s exactly when these rollups shine.
My kids begged for more after the first bite, and my husband (who’s picky about cheeseburgers) declared them “better than takeout.” There’s something magical about rolling all those classic cheeseburger flavors into a golden, buttery crescent roll. It’s got everything you crave from a burger—savory beef, gooey cheese, a hint of onion—all wrapped up in the most satisfying way. And don’t even get me started on that garlicky butter brushed over the top. It’s the secret sauce, so to speak!
If you’re looking for a family-friendly meal that’s as fun to make as it is to eat, these garlic butter cheeseburger rollups are it. They’re perfect for busy weeknights, casual gatherings, or even as a hearty after-school snack. I’ve tested the recipe more times than I can count, tinkering with the filling and butter blend until it hit that sweet spot of flavor and comfort. Plus, they reheat like a dream—if you manage to have leftovers.
So, whether you’re a cheeseburger fanatic, have little ones who love to help in the kitchen, or just need a new dinner idea, this garlic butter cheeseburger rollups recipe is about to become your go-to. Trust me, you’ll be sneaking an extra one for yourself before everyone else gets to the table!
Why You’ll Love This Recipe
- Quick & Easy: Comes together in under 40 minutes from start to finish—yes, including prep and baking! Perfect for weeknights when you want dinner on the table fast.
- Simple Ingredients: No weird stuff—just pantry staples like ground beef, cheese, and refrigerated crescent dough. You probably have everything already.
- Perfect for All Occasions: These rollups are a hit at family dinners, game day parties, or as a fun potluck finger food. They travel well and taste amazing warm or at room temp.
- Crowd-Pleaser: Kids adore the gooey cheeseburger filling, and adults love the savory garlic butter crust. I’ve never had leftovers at a party!
- Unbelievably Delicious: The combo of juicy beef, sharp cheddar, and garlicky butter is pure comfort food. It’s the kind of meal that makes you sigh with happiness after every bite.
What makes my garlic butter cheeseburger rollups different? I blend a little cream cheese into the filling for extra richness, and I don’t skimp on the garlic butter topping. That’s the trick—brushing the rolls twice, before and after baking, for maximum flavor. The filling stays juicy, and every bite has that classic burger taste with a twist.
For me, this recipe isn’t just another dinner hack—it’s the one that brings everyone to the kitchen, eager to help and even more eager to eat. These rollups turn a simple meal into a memory, and honestly, that’s why I keep coming back to them week after week. Whether you’re feeding picky eaters or just craving a little nostalgia, you’ll love how easy and satisfying this recipe is.
Ingredients Needed
This recipe uses simple, wholesome ingredients to deliver bold flavor and a super satisfying texture. Most of these are items I always keep stocked—nothing fancy, just hearty, classic taste! Here’s what you need for these garlic butter cheeseburger rollups:
- For the Filling:
- 1 lb (450g) ground beef (I like 85/15 for juiciness, but leaner works if you prefer)
- 1/2 small onion, finely diced (yellow or white, about 1/3 cup)
- 2 cloves garlic, minced (for that classic burger flavor—fresh is best!)
- 1/4 cup (60g) cream cheese, softened (adds creaminess and helps bind the filling)
- 1/2 cup (60g) shredded cheddar cheese (sharp or medium—pre-shredded works, but I love freshly grated)
- 1 tablespoon ketchup (adds just the right tang, like a secret ingredient!)
- 1 tablespoon yellow mustard (trust me, it doesn’t overpower—just gives burger vibes)
- 1/2 teaspoon salt (or to taste)
- 1/4 teaspoon black pepper
- Optional: 1 tablespoon chopped pickles (for a zippy kick, totally up to you!)
- For the Rollups:
- 2 cans (8 oz/226g each) refrigerated crescent roll dough (Pillsbury is my go-to, but store brand works too)
- 1 cup (115g) shredded mozzarella or Monterey Jack cheese (for extra meltiness—use what you have)
- For the Garlic Butter Topping:
- 4 tablespoons (56g) unsalted butter, melted
- 2 cloves garlic, minced (or 1/2 teaspoon garlic powder if you’re in a rush)
- 1 tablespoon chopped fresh parsley (optional, but it looks pretty and adds freshness)
- Pinch of salt
Ingredient Tips: If you can’t have dairy, swap the cream cheese and cheddar for dairy-free alternatives (Daiya makes a decent one). Use plant-based ground “beef” for a vegetarian version. Out of crescent dough? Pizza dough or even flattened biscuit dough works in a pinch, though the texture will change a bit. And if you’re feeling extra, sprinkle sesame seeds on top for that “burger bun” look!
Equipment Needed
- Large Skillet or Frying Pan: For browning the beef and onions. I use a nonstick skillet, but cast iron works too (just wipe it down after for easy cleanup).
- Mixing Bowl: To combine the filling. A medium bowl is enough, but I like using a big one so nothing spills over.
- Baking Sheet: Standard size (about 13×18-inch or 33x46cm) lined with parchment paper or a silicone baking mat for easy cleanup and nonstick results.
- Pastry Brush: For brushing that glorious garlic butter. If you don’t have one, a spoon or even your (clean!) fingers work in a pinch.
- Measuring Cups and Spoons: Always helps with accuracy, especially for the garlic butter and seasonings.
- Cheese Grater: If you’re shredding your own cheese (which I swear by for best meltiness).
- Knife and Cutting Board: For dicing onions, mincing garlic, and chopping parsley.
If you don’t have a pastry brush, honestly, just drizzle the butter over the rollups or use the back of a spoon. For baking sheets, I’ve used both metal and ceramic—just keep an eye on the bottoms so they don’t overbrown. And if you’re on a tight budget, dollar store mixing bowls and baking sheets totally do the job (been there, done that!).
Preparation Method
- Preheat your oven & prep the baking sheet.
Preheat the oven to 375°F (190°C). Line a baking sheet with parchment paper or a silicone mat—trust me, this prevents sticking and makes cleanup a breeze. - Cook the beef and onions.
In your skillet over medium heat, add the ground beef and diced onion. Cook for 5-7 minutes, breaking up the meat as it browns. You’re looking for no pink left and onions just starting to go translucent. Drain excess fat if needed—no one likes soggy rollups! - Add garlic and seasoning.
Toss in the minced garlic, salt, and pepper. Cook for another 1-2 minutes, stirring often. You want to smell that garlic (but not burn it). If using pickles, add them now. - Mix in the cheeses and sauces.
Remove the pan from heat. Stir in the cream cheese until melted and combined. Add cheddar, ketchup, and mustard. Mix until it’s creamy and everything is evenly coated. Let the mixture cool for 5 minutes—hot filling can melt the crescent dough and cause leaks! - Prepare the crescent dough.
Unroll the crescent dough on a clean surface. Separate into triangles (16 total). If they’re sticky, lightly flour your hands and the counter. - Fill and roll.
Spoon about 1 to 1.5 tablespoons of the beef mixture onto the wide end of each triangle. Sprinkle with a little mozzarella (about 1 tablespoon per rollup). Gently roll each one up from the wide end to the tip, tucking the sides a bit as you go to seal in the filling. Place seam-side down on your prepared baking sheet, spacing them out so they don’t touch. - Make the garlic butter.
In a small bowl, combine melted butter, minced garlic, a pinch of salt, and parsley (if using). Give it a good stir. - Brush and bake.
Brush each rollup generously with garlic butter—don’t be shy! Pop the tray in the oven and bake for 14-17 minutes, until golden brown and puffed. - Final brush (the secret step!).
Right after they come out of the oven, brush the rollups again with any leftover garlic butter. This step adds crazy flavor and keeps them shiny and soft. - Cool slightly and serve.
Let the rollups cool for 5 minutes (they’re hot inside!). Serve warm with ketchup, burger sauce, or whatever you love for dipping.
Troubleshooting: If you notice the dough splitting, use a little less filling. If the bottoms are browning too fast, slide a sheet of foil underneath halfway through baking. And if you accidentally overbake, don’t panic—the garlic butter saves the day!
Cooking Tips & Techniques
- Don’t Overfill: I know, it’s tempting to stuff them full, but too much filling can burst the dough. Stick to about 1 to 1.5 tablespoons—trust me, they taste just right!
- Cool the Filling: Hot filling melts the dough before baking. Give it a few minutes to cool so the rollups hold their shape.
- Seal the Edges: Pinching the edges as you roll helps prevent leaks. Even if a little cheese escapes, the crispy bits are kind of the best part!
- Double Brush the Butter: Brush before AND after baking for that extra garlic punch and an irresistibly glossy finish. Don’t skip this step—it’s a game-changer.
- Watch the Bake Time: Ovens can be quirky. Start checking at 14 minutes. If the tops are golden and the bottoms are lightly browned, you’re good.
- Batch Cooking: Making a double batch? Bake on two trays, rotating halfway through for even color. You can freeze unbaked rollups—just thaw and bake as usual.
- Personal Mistakes: Once, I forgot to drain the beef, and my rollups were a bit soggy. Always drain excess fat! Also, I learned (the hard way) not to walk away—these can go from golden to too-brown fast.
For multitasking, prep the filling while the oven preheats. You can even make the beef mixture a day ahead—just warm it up before filling. To keep things consistent, use a cookie scoop for portioning. And if you want every rollup to look bakery-perfect, give them a little egg wash before the garlic butter for extra shine (not required, but it’s fun!).
Variations & Adaptations
- Low-Carb/Keto: Swap crescent dough for low-carb tortilla wraps or use fathead dough. You’ll get that cheeseburger flavor without the carbs—just watch bake times, as alternative doughs brown quickly.
- Vegetarian: Use plant-based ground “beef” and vegan cheese. I’ve tried this with Beyond Meat crumbles and it’s super tasty! You can also add sautéed mushrooms or black beans for extra protein.
- Spicy Kick: Add diced jalapeños to the filling, or sprinkle red pepper flakes into the garlic butter. Pepper Jack cheese is a great swap for extra heat.
- Allergen-Friendly: Gluten-free crescent dough (available in most health food stores) works well, though the texture is a bit different. For dairy-free, use vegan butter, cheese, and cream cheese alternatives.
- Seasonal Twist: In summer, add diced tomatoes and fresh basil to the filling; in winter, swap the cheddar for Swiss and throw in some sautéed mushrooms for a “Swiss burger” vibe.
- Personal Favorite: Sometimes, I sneak a little crumbled bacon into the filling—because, well, bacon. It’s not traditional, but wow, is it good!
Serving & Storage Suggestions
These garlic butter cheeseburger rollups are best served warm, fresh from the oven. They look great piled on a wooden board, sprinkled with fresh parsley, and surrounded by little bowls of ketchup, burger sauce, or even ranch for dipping. For a meal, pair with crispy fries, a simple salad, or roasted veggies.
If you’re prepping ahead, rollups keep well in the fridge for up to 4 days. Store in an airtight container and reheat in the oven at 350°F (175°C) for 8–10 minutes, or microwave for about 30 seconds (though the oven keeps them crispier). They also freeze beautifully—just cool completely, wrap tightly, and freeze for up to 2 months. Thaw in the fridge overnight and bake as usual to refresh.
Honestly, the flavors deepen after a day—the garlic butter soaks in, and the filling gets even juicier. Perfect for lunchboxes or a quick dinner redo!
Nutritional Information & Benefits
Each garlic butter cheeseburger rollup is approximately 230 calories, with 12g protein, 14g fat, and 15g carbs. They’re a good source of protein (thanks to the beef and cheese) and calcium. If you use lean beef and reduced-fat cheese, you can bring the fat content down a bit. There’s flexibility for gluten-free or dairy-free diets, depending on the dough and cheese you select.
Potential allergens include wheat, dairy, and eggs (in some crescent dough brands). If you have food sensitivities, check your labels carefully or use trusted substitutes.
For me, these rollups fit into a balanced meal plan—pair with a side salad or steamed veggies, and you’ve got a dinner that’s hearty, comforting, and satisfying. Plus, they’re kid-approved, which always makes my wellness radar happy!
Conclusion
Garlic butter cheeseburger rollups are the kind of recipe you’ll want to make on repeat. They’re easy, delicious, and totally customizable to whatever your family craves. I love how these rollups bring everyone to the table—no complaints, just lots of happy faces and empty plates.
Don’t be afraid to mix things up—try different cheeses, sneak in some veggies, or add a dash of your favorite spices. That’s the beauty of this recipe: it’s a canvas for your cheeseburger dreams!
I hope you enjoy these as much as we do. If you try the recipe, let me know in the comments below—share your tweaks or serving ideas! And if you’re feeling generous, give this recipe a share or pin it for later. Trust me, your future self will thank you!
FAQs
Can I make garlic butter cheeseburger rollups ahead of time?
Absolutely! You can assemble the rollups, cover, and refrigerate for up to a day before baking. Just add a couple extra minutes to the bake time if they’re cold from the fridge.
What’s the best way to reheat leftovers?
The oven is your best friend—350°F (175°C) for about 8 minutes keeps them crispy. The microwave works too, but the dough will be softer.
Can I freeze these rollups?
Yes! Freeze baked rollups in an airtight container for up to 2 months. Thaw overnight in the fridge and reheat in the oven for best results.
What dipping sauces go well with garlic butter cheeseburger rollups?
Ketchup, burger sauce, ranch, or even honey mustard are all great. Sometimes we go wild and serve with sriracha mayo for a spicy twist.
Can I use ground turkey or chicken instead of beef?
Definitely! Ground turkey or chicken works well—just be sure to season generously since they’re milder than beef.
Pin This Recipe!

Garlic Butter Cheeseburger Rollups
- Total Time: 32 minutes
- Yield: 16 rollups (about 6–8 servings) 1x
Description
These garlic butter cheeseburger rollups combine juicy beef, melty cheese, and a garlicky butter crust all wrapped in crescent dough for a family-friendly, easy dinner. Perfect for busy weeknights, parties, or as a hearty snack, they’re a fun twist on classic cheeseburgers and always a crowd-pleaser.
Ingredients
- 1 lb ground beef (85/15 preferred, but leaner works)
- 1/2 small onion, finely diced (about 1/3 cup)
- 2 cloves garlic, minced
- 1/4 cup cream cheese, softened
- 1/2 cup shredded cheddar cheese
- 1 tablespoon ketchup
- 1 tablespoon yellow mustard
- 1/2 teaspoon salt
- 1/4 teaspoon black pepper
- Optional: 1 tablespoon chopped pickles
- 2 cans (8 oz each) refrigerated crescent roll dough
- 1 cup shredded mozzarella or Monterey Jack cheese
- 4 tablespoons unsalted butter, melted
- 2 cloves garlic, minced (or 1/2 teaspoon garlic powder)
- 1 tablespoon chopped fresh parsley (optional)
- Pinch of salt
Instructions
- Preheat oven to 375°F (190°C). Line a baking sheet with parchment paper or a silicone mat.
- In a large skillet over medium heat, cook ground beef and diced onion for 5-7 minutes, breaking up the meat until browned and onions are translucent. Drain excess fat.
- Add minced garlic, salt, and pepper to the skillet. Cook for 1-2 minutes, stirring often. Add chopped pickles if using.
- Remove from heat. Stir in cream cheese until melted and combined. Add cheddar cheese, ketchup, and mustard. Mix until creamy and evenly coated. Let cool for 5 minutes.
- Unroll crescent dough and separate into 16 triangles.
- Spoon 1 to 1.5 tablespoons of beef mixture onto the wide end of each triangle. Sprinkle with about 1 tablespoon mozzarella per rollup. Roll up from the wide end to the tip, tucking sides to seal. Place seam-side down on prepared baking sheet.
- In a small bowl, combine melted butter, minced garlic, pinch of salt, and parsley (if using).
- Brush each rollup generously with garlic butter.
- Bake for 14-17 minutes, until golden brown and puffed.
- Immediately after baking, brush rollups again with any remaining garlic butter.
- Let cool for 5 minutes before serving. Serve warm with ketchup, burger sauce, or your favorite dip.
Notes
Don’t overfill the dough to prevent bursting. Cool the filling before rolling to avoid melting the dough. Double-brush with garlic butter for maximum flavor. For a vegetarian version, use plant-based ground ‘beef’ and vegan cheese. Rollups can be assembled ahead and baked later, and they freeze well for up to 2 months.
- Prep Time: 15 minutes
- Cook Time: 17 minutes
- Category: Main Course
- Cuisine: American
Nutrition
- Serving Size: 1 rollup
- Calories: 230
- Sugar: 3
- Sodium: 410
- Fat: 14
- Saturated Fat: 7
- Carbohydrates: 15
- Fiber: 1
- Protein: 12
Keywords: cheeseburger rollups, garlic butter, crescent roll dinner, family dinner, easy weeknight meal, kid-friendly, ground beef recipe, party appetizer


